From the moment a customer arrives with a data loss situation, it’s important that a safe data recovery procedure be implemented so as to avoid unnecessary data loss. All too often this data loss is the fault of the first responder, the computer repair shop or technician.
Almost every week we get in drives with critical business data worth tens of thousands of dollars to the customer, yet their computer technician improperly handled the case leading to permanent data loss.
Please! Don’t be that idiot who puts someone’s entire business literally in the freezer!
Safe HDD Data Recovery Procedure
The below infographic flowchart shows how to properly treat a case of data loss from a hard disk drive. While you may have been taught to try a number of other things by well meaning computer techs, the fact is these tactics lead to permanent data loss every single day, and can lead to lawsuits from the customers they hurt.
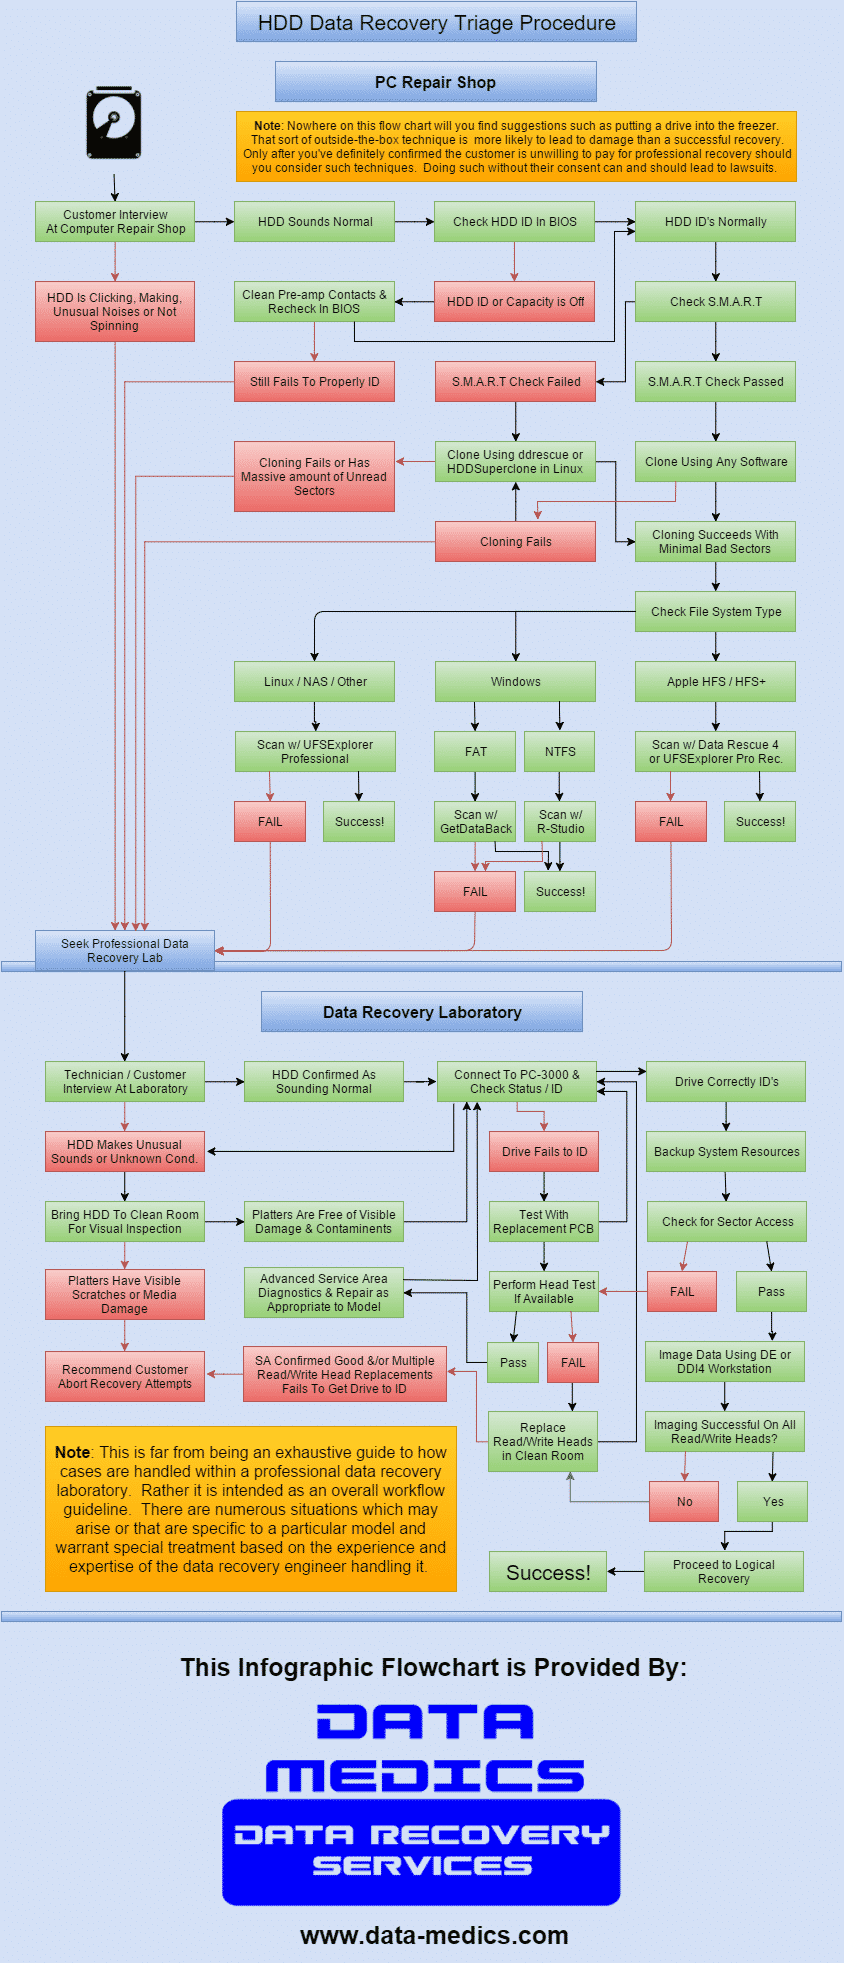
Understanding This Data Recovery Procedure
First off, we’re well aware that many computer technicians are accustomed to putting hard drives into freezers, hitting them against a tabletop (yes, some guys actually do this), and other outside-the-box techniques. On the rare occasion these tactics can actually lead to a recovery, but more often cause permanent damage. We’re not saying you should never, under any circumstances, try these things. Just that you should only do it after the customer has definitively decided that their data isn’t worth a few hundred dollars for professional data recovery service at a lab. Many tech’s however just take it upon themselves to decide to try such extreme measures, and in the process permanently lose data that could have been worth thousands of dollars to the customer.
That having been said, if the data is important and you wish to minimize any potential risk of causing further data loss, then this flow chart shows the data recovery procedure to follow. It’s intent is to limit the number of risk factors while still providing diagnostics and potential to recover the data in-house without lab work being required.
Customer Interview and Sound Check
The first step, and one that’s most often overlooked, is the customer interview. If the customer knows already that the HDD is clicking, isn’t spinning, is making another odd noise, or was dropped, then the last thing you should do is even apply power. Drives in this condition can be mechanically damaged internally leading to further data loss each time it’s powered on.
If the customer didn’t notice any sounds, and the drive wasn’t physically dropped or damaged, the technician should himself conduct a listen test immediately when it’s powered on. If there’s any unusual sound, immediately power down and consider professional data recovery service. There’s no point running any software utilities or continuing to run a drive in such a case. You can’t fix a hardware issue using software, EVER!
Clone The Original Hard Drive
This is another often overlooked step. Many technicians immediately jump to scan the original hard drive using data recovery software. However during this scanning process, data isn’t actually being saved anywhere. It’s only keeping track of where different files are found. If the HDD dies completely 90% into the scan, you’re left with exactly 0% recovered. However if you were cloning the drive instead and it failed at the 90% mark, you’ve probably got most if not all of the data. Don’t overlook this critical step!
Also, it’s important what software you use. It may be that the data loss is only the result of a few bad sectors. These normally tend to appear near the beginning of the drive where the file tables are stored, which makes sense given that it’s the most accessed part of the drive. Windows based tools are not able to handle bad sectors well because they all rely on the Window Host Controller which is the go-between from the software to the actual drives. So if there are S.M.A.R.T. errors particularly pertaining to pending or re-allocated sectors, you’ll need to clone in Linux. The two tools which are best suited to this task are ddrescue and a new tool called HDDSupertool. You can find out more about these tools and how to use them on our forum.
Chose The Right Software For The File System
There is no one one tool that’s right for every data recovery situation. Each has it’s own strengths and weaknesses relating to different file systems. The flow chart recommends the tools we’ve found to be most effective for each respective file system type. If you’ve only got a budget to buy one tool, you should probably consider R-Studio or possibly UFSExplorer, as they support the greatest variety of file systems. However in some cases such as Mac HFS+ drives, another tool like Data Rescue 4 will have better results.
Know When to Seek Professional Laboratory Services
The worst thing you can do as the computer technician is not knowing when to quit. Sadly we have some computer repair shops who only ever bring us catastrophically destroyed hard drives. By the time they bring a case in to us they’ve already tried every crazy thing they’ve seen on youtube or read about online, and the platters were destroyed in the process.
Yet, we have other computer repair clients who have had almost 100% of their submitted cases recovered. The difference is they knew when to quit and got the drive to us at the first sign of a hardware issue. Remember, you can still make money on a case even if it has to be outsourced to a lab. Data recovery services aren’t as expensive as they once were, and for a few hundred dollars most cases can be recovered. Your customer will be happy, and you can even mark up the recovery cost so you get a profit too. With our re-seller and partner programs you can get 10%-20% off all our services too, so your markup will be even better.